
Read Next

Watch What You Photograph!
Watch what you photograph! Here's why...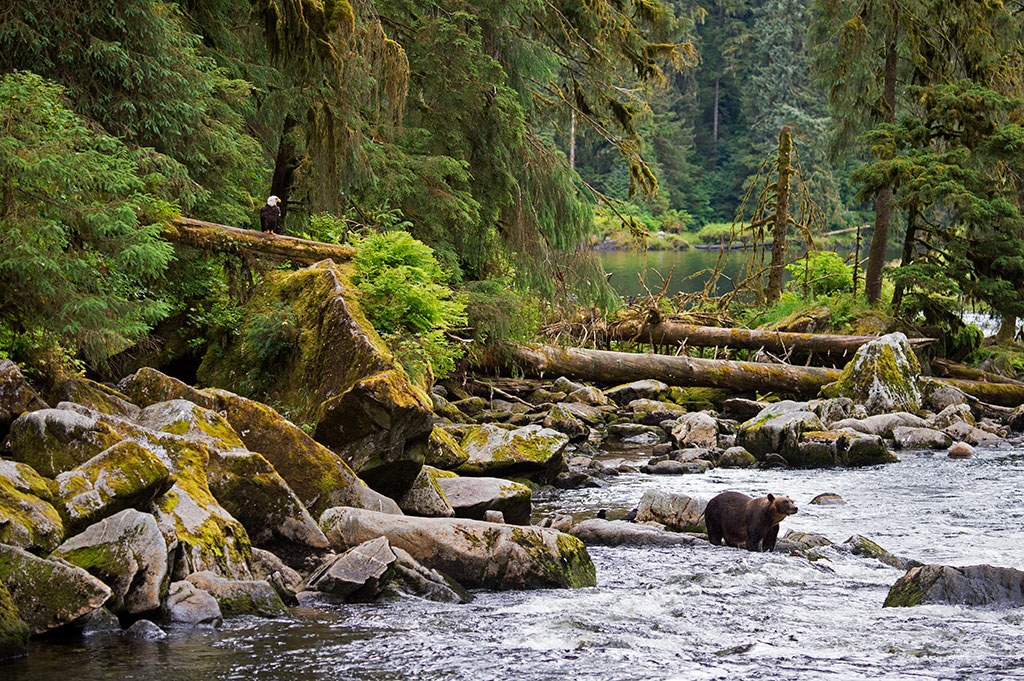
Close Encounter With Bear Gives Photographer A Jolt (& A Great Image)
Ever stumbled across an animal...
5 Ways to Create Stunning Photos Using New Angles
Even a small change in perspective can...
Curating Your Images Will Improve Your Photography. Here’s How
In my past “On Landscape” columns, I’ve discussed improving your photography by creating themes of your favorite subjects (see “Curating Inspiration” from the December 2021 issue of Outdoor Photographer here). I suggest building theme ideas by researching your photo archives, creating collections of images, and then making new photographs complementing these. I also advocate editing for specific projects or types of clients, what I call “context editing.”
I want to help you get started on this process with an assignment. Choose a subject or theme for your collection, and then either make new images or add photographs from your archive that fit that subject or theme.
Curating your photographs well is a critical way to improve your photography. As you develop your skills, you won’t see the improvement if you don’t organize and document your progress visually.
I find Lightroom’s Collections and Survey tools to be vital in this process. I especially find the Survey option helpful, and it is what I used for the coastal set shown here. For those of you not familiar with Survey, it allows you to get a clearer sense of what you have to work with. I can see if I have images that are too similar and what styles of capture—like fast or slow shutter speeds—work together or don’t.
Once my images are in Survey, I can tell if I have too many similar compositions or too many of one season and not enough of another. My favorite way to do this is to select the images, click on the Survey mode and then press the Tab key to hide the side panels. To further simplify and visualize, I’ll use the Lights Out view to see all of my selected images.
The Process Of Building Themes
When you begin the incremental process of building a theme, you will discover that the undertaking has its ups and downs, with changes of direction or speed of progress that are to be expected in this creative exercise. The art of blending images into a cohesive group takes much practice, involving the additional refinement of your theme concept, ideally making the portfolio stronger each step of the way. The key steps in my process are:
As mentioned previously, the images I select when editing depend on the context in which they will be used. My most creative images are often selected for more specialized and limited purposes. They are reserved for my fine art portfolio. They will appear in photography galleries selling my fine art prints and in books and articles where I want my very best work represented.
If you’ve presented your photographs very often, you’ve probably realized the need to consider your audience. A “fine art” audience would not have the same interests as a group interested in travel destinations. For a travel group, you might broaden your edit to include images of historical or cultural locations.
My images shown in this article are an example of this. I’ve photographed along the California coast for several decades and want to present them for possible exhibit in a photography gallery. These images include intimate coastal details not so typical of your standard scenic views of the Big Sur region. I would want my most personal imagery to “hold its own” in a gallery that also represents master photographers such as Ansel Adams, Edward Weston, Minor White, Wynn Bullock, Jerry Uelsmann, Michael Kenna and Eliot Porter.
To help you get started on this exercise, choose a context in which your portfolio could be presented. I often work with students who have an upcoming exhibit or a book idea they’ve had for years but never got started. Or the context could be updating a web gallery or delivering a proposal to a publisher. Edit your images, old and new, into a group that shows consistency of quality. Keep in mind that a variety of lighting types, location, scale, season and subject matter will add depth to the portfolio.
Make A Photographer’s Statement
Once you’ve made your selection of images, I highly recommend that you write a brief essay, or photographer’s statement, about the collection. This can be just a few sentences, or you can write more if you want to. Being concise is helpful—no more than one page of text is a good rule of thumb. Your words should define the goals for your selected theme or what inspires you about the theme.
This statement gives you the opportunity to address the potential viewer. Write as if you are introducing the portfolio to a new audience, as if they know nothing about you or your images. Imagine that you are writing an introduction to a book. If you were asked to exhibit your prints, an artist’s statement or opening essay would likely be a requirement. The writing can take the form of a story about making the image in some creative way, a description of the mood or emotion that the work evokes in you, or even a poem. Whatever form it takes, try to relate your experiences to the viewer.
I realize that some folks don’t feel comfortable or confident about such writing, but I feel that it is a good exercise for any portfolio’s development, as it will help you define your interests and thought process. The writing process often stimulates ideas for theme titles and may help remind you of additional photographs in your archive that you hadn’t thought of including previously.
Here is a small selection of recent images from Big Sur and the central California coast. The theme title of this collection is “Coastal Zen.” I feel that the images as a group are on the same level in both quality and creativity. They are diverse in subject matter, giving the viewer a personal, unique and intimate view of this epic and magical area. This sample edit is a small illustration of a good balance of subjects, color, scale and quality.
The Editing Process
I use Lightroom’s Collections to organize theme ideas and for actual projects. For this assignment, edit your collection using both technical and aesthetic criteria—which is perhaps obvious but not as easy as it sounds. My themes often start with dozens if not hundreds of photos and slowly get narrowed down over many repeated viewings. As discussed above, I highly recommend using Lightroom’s Survey mode to better see sets of images on the computer screen, which is what I did for the coastal images shown here.
Once you get started and decide on a subject for this assignment, you may be inspired to make new images or add photographs from your archive. Be willing to make mistakes. Dig into your existing library to seek out those images that fit the theme and maintain a high quality. Make use of all these ideas to narrow in on what excites you about the subject.
If you find this essay useful, I think you’ll enjoy my new book, The Photographer’s Portfolio Development Workshop, published by Rocky Nook. It teaches my full approach to building thematic bodies of photographs that more strongly reflect your passions and visual creativity.
This is a small section of older, “established” photographs. My process is simply to take the older image and blend them into a strong and more current body of work, ready to present for a possible exhibit.
The grouping here includes a “best of” old and new images, to illustrate the blending and depth-building process.