
Read Next
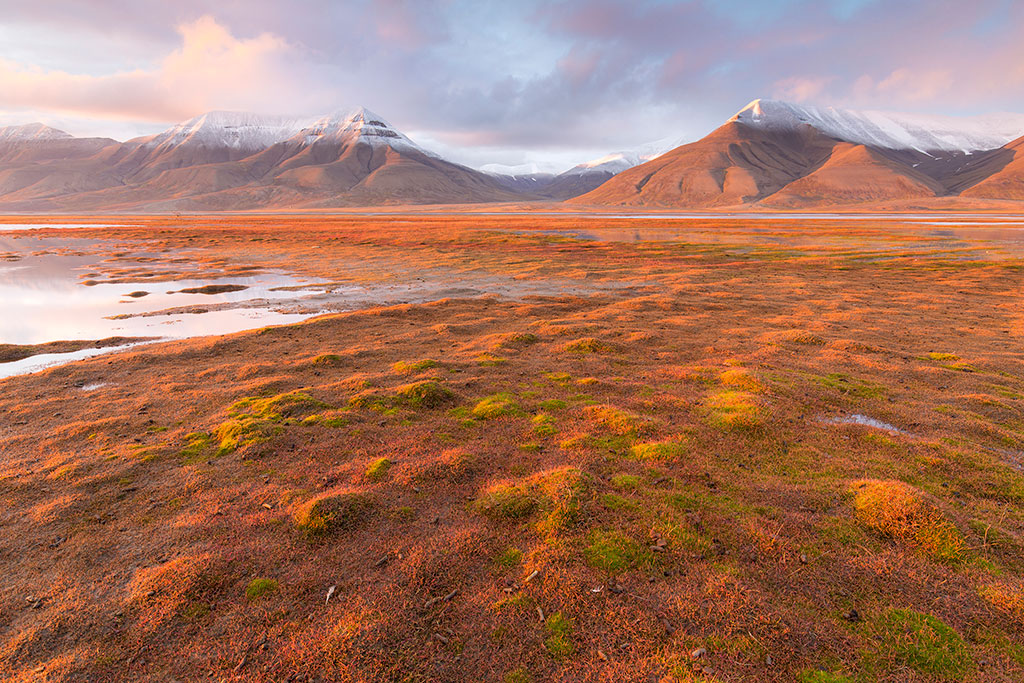
Why You Should Visit Svalbard In Norway For Photography
Svalbard in Norway features untouched...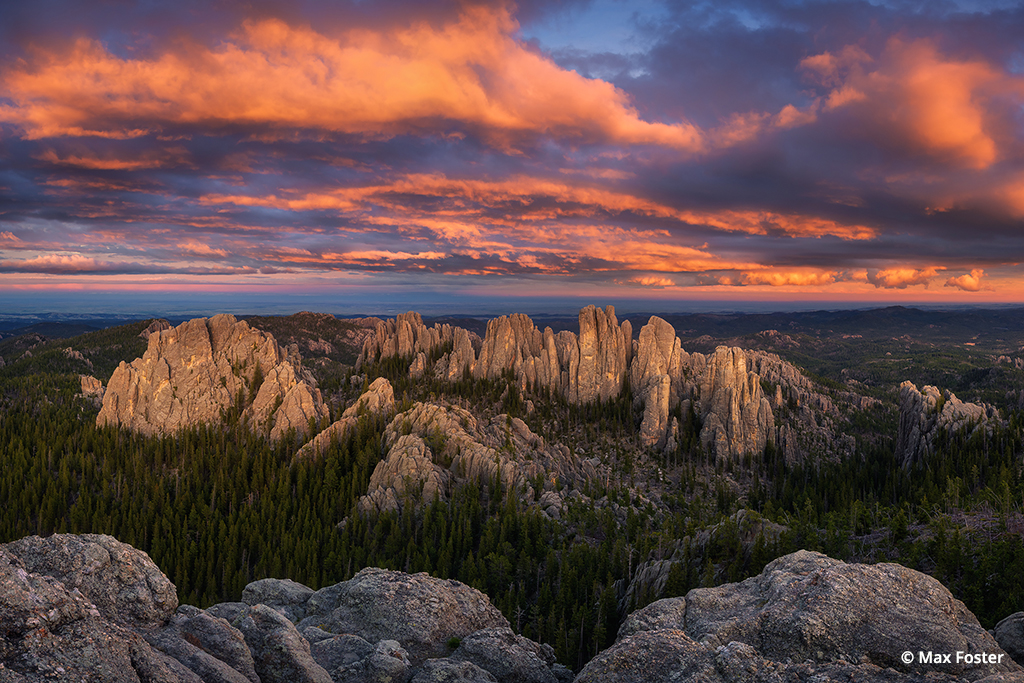
The Needles
The Black Hills of South Dakota cover...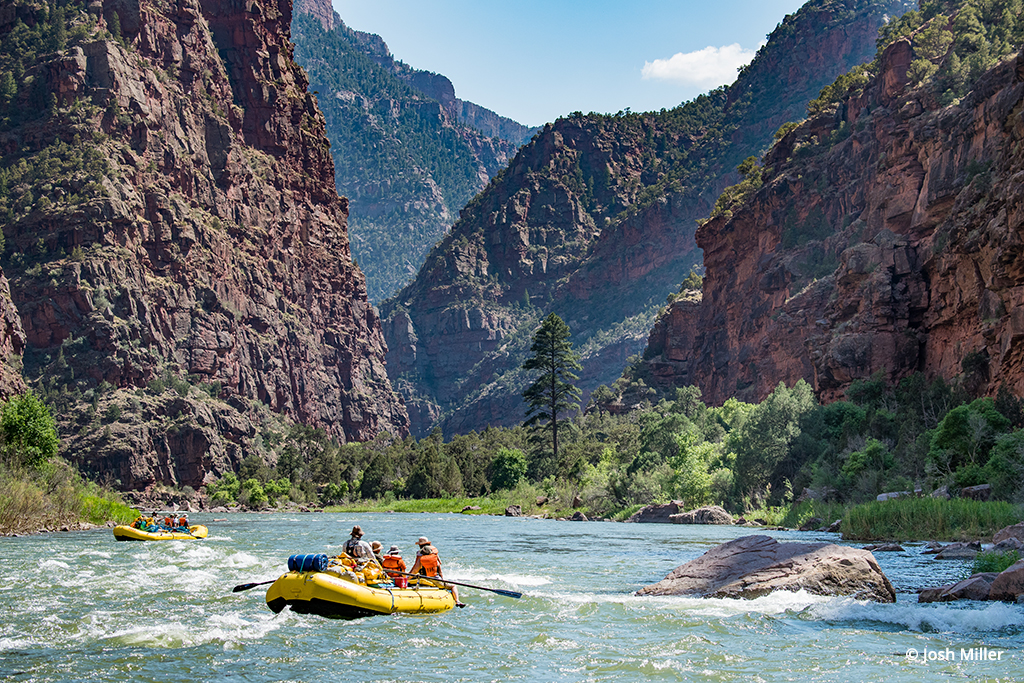
Dinosaur Adventure!
After feeling trapped at home for the...
Grand Canyon Hotspots
Sunset, Desert View, Grand Canyon, South Rim. An extreme telephoto lens will compress Grand Canyon’s horizontally stacked ridges; composing toward the sun at sunrise or sunset will create silhouettes, and a hard-stop graduated neutral-density filter will help retain sunrise/sunset color.
Grand Canyon is as difficult to photograph as it is breathtaking. The canyon’s layered detail shrinks in a lens that’s wide enough to adequately convey its scale, while its overwhelming scale is lost to a telephoto lens focused on its detail. Grand Canyon is really two worlds: the year-round, relatively accessible, always bustling South Rim; and the warm-month-only (mid-May through Thanksgiving), relatively remote and more peaceful North Rim. Separated by 10 crow-flying miles, it’s a grueling, 18-mile hike and a scenic four-hour drive between rims.
Grand Canyon South Rim Tips
The section of the Colorado River visible from the South Rim moves more or less east to west. Among the vista points with good views to the east, for sunrise and afternoon rainbows, are Grandview Point, Mather Point, Yaki Point, Powell Point and Hopi Point. Vistas where you can photograph the setting sun and morning rainbows include Desert View, Navajo Point, Lipan Point, Yavapai Point, Hopi Point and Pima Point.
Much of your South Rim success will be determined by your ability to anticipate and avoid tourists. The South Rim from Mather Point west, with its close proximity to park services (parking, hotels, restaurants, shops, camping), teems with tourists. Further west, the Hermit’s Rest Road shuttles (shuttle or handicap access only in summer) are also packed all summer long.
Mather Point is so crowded for sunrise and sunset that it’s usually best to avoid, but if you hit the snooze once too often and find yourself needing a sunrise location that doesn’t require a lot of effort before your first coffee, try the view from the rail near the amphitheater, just east of the packed Mather Point vista. Or, better yet, park near Yavapai Point, about a mile west, and walk the rim toward Mather until you find a view that moves you.
For a South Rim sunset, it’s hard to beat Hopi Point. With views in both directions, Hopi is worth the Hermit’s Rest Road shuttle ride, but this fact isn’t lost on everyone else in the park, and you may just feel like they’ve all joined you. If you don’t want to deal with the crowd at Hopi, less crowded Hermit’s Rest Road options are Powell Point (a short walk from Hopi) for views to the north and east, and Pima Point for views north and west.
The eastern vista points along Desert View Road (Highway 64)—Lipan Point, Navajo Point and Desert View—tend to be a little less crowded, especially if you explore a short distance from the designated vista. If I don’t have a specific objective other than to find a nice shot, this is where I go, especially for sunset.
Sunset, Hopi Point, Grand Canyon, South Rim. Walking the canyon’s rim not only gets you away from the crowds hovering at the designated vista, it’s also the best way to find the trees, shrubs and rocks that add depth to your images.
What makes these eastside vistas particularly appealing is their view of the 90-degree bend in the Colorado River. Near the bend you can look north, upriver, toward the Little Colorado River and Marble Canyon, and a great distance downriver to the west. This west view from any of the South Rim’s eastside vistas is the best place to break out the telephoto lens and compress the succession of ridges that recede into the distance.
Grand Canyon North Rim Tips
After spending a few days battling crowds on the South Rim, the relative peace of the North Rim is a welcome relief. This peace, and the variety of scenes, is why I consider the South Rim the tourist’s Grand Canyon and the North Rim the photographer’s Grand Canyon.
While South Rim photography is primarily about grand views, on the North Rim you can also find summer wildflowers and evergreen forests accented by groves of aspen that turn brilliant yellow in late September. And its views to the south make the North Rim the best place to view approaching thunderstorms during the summer monsoon, as well as the glow of the Milky Way’s center on a dark summer night.
Three Strikes, Bright Angel Point, Grand Canyon, North Rim. Grand Canyon’s summer monsoon storms tend to move south to north. The southern exposure of the North Rim’s Grand Canyon Lodge and Bright Angel Point provides a wonderful vantage point for the thunderstorms’ approach, as well as nearby cover when they get too close.
For the best south and west views on the North Rim, check out Bright Angel Point and Cape Royal. Bright Angel is a five-minute walk from the North Rim Visitor Center and Grand Canyon Lodge (the North Rim’s only rim-side lodging).
Cape Royal is about an hour from Grand Canyon Lodge, at the end of Cape Royal Road, and an easy 10-minute walk from the large parking lot there. While walking out to Cape Royal, if you’re not bothered by heights, make sure to take the short detour out to Angel’s Window.
The other easily accessed North Rim vistas look east, and all are accessible from Cape Royal Road: Point Imperial (a personal favorite), Vista Encantada (too obstructed by shrubs for my taste), Roosevelt Point and Walhalla Point.
If you want to do a little exploring, the North Rim is crisscrossed by a network of unpaved National Forest Service roads just outside the National Park Boundary (many navigable by passenger cars). While dusty, washboard, 50-mile round-trips aren’t for everyone, if you like rarely photographed, solitary canyon panoramas, these roads are well worth the effort.
Caution: Your GPS can’t distinguish between the relatively navigable primary NFS roads and the narrow, often impassible side roads, so never attempt these roads without a prior visit to the North Rim Visitor Center for a detailed map and consultation with a ranger.
Milky Way, Angel’s Window (near Cape Royal), Grand Canyon, North Rim. Dark night skies and an open view of the southern horizon make the North Rim ideal for summer Milky Way photography. Because the view from Grand Canyon Lodge and Bright Angel Point is partially washed out by light pollution from Grand Canyon Village on the South Rim, Cape Royal, Angel’s Window and Walhalla Point are a better bet.
Equipment For Your Grand Canyon Trip
While wide-angle shots are everywhere on the rim, it’s a mistake to leave your telephoto home. I used to think I’d be fine if I could cover focal ranges from 20mm to 200mm, but the more I visit, the more I appreciate the value of a long lens for isolating individual features at Grand Canyon. On my latest visit, nearly a quarter of my images were in the 200mm to 600mm range.
A polarizer not only deepens the blue sky and enhances the clouds (especially for cross-canyon compositions), it also cuts some of the haze that frequently hangs below the rim and enriches the canyon’s predominant red and green hues.
And despite the continued improvement of today’s digital sensors, a graduated ND filter is invaluable for wringing every last stop of dynamic range from Grand Canyon’s high-contrast sunrises and sunsets. The canyon’s flat horizon is ideally suited for hard-transition GNDs. I get the most use from my 3-stop hard and 3-stop reverse GND filters.
Regardless of where you end up at Grand Canyon, arrive early enough to explore the rim nearby. In addition to a little more elbow room, you’ll likely find a foreground tree or shrub to accent and add depth to your composition. And, most importantly, at each stop, be sure to set your camera aside long enough to simply take in the view and appreciate that you’re witnessing one of the most beautiful scenes on Earth.
Gary Hart is a Northern California-based professional photographer and writer who conducts photo workshops in Death Valley, the Eastern Sierra, Grand Canyon, Hawaii and Yosemite. See more of his work at garyhartphotography.com.